Imagine this: soft candlelight flickering across delicate snowflake patterns, filling your home with the soothing aroma of eucalyptus and lavender or the sweet warmth of vanilla and orange.
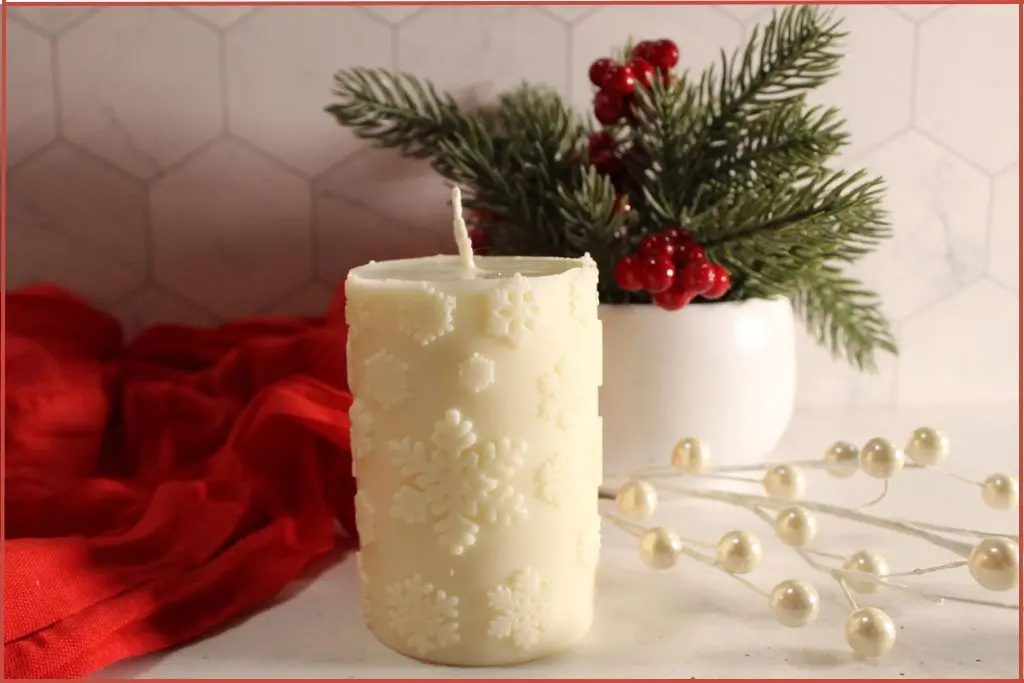
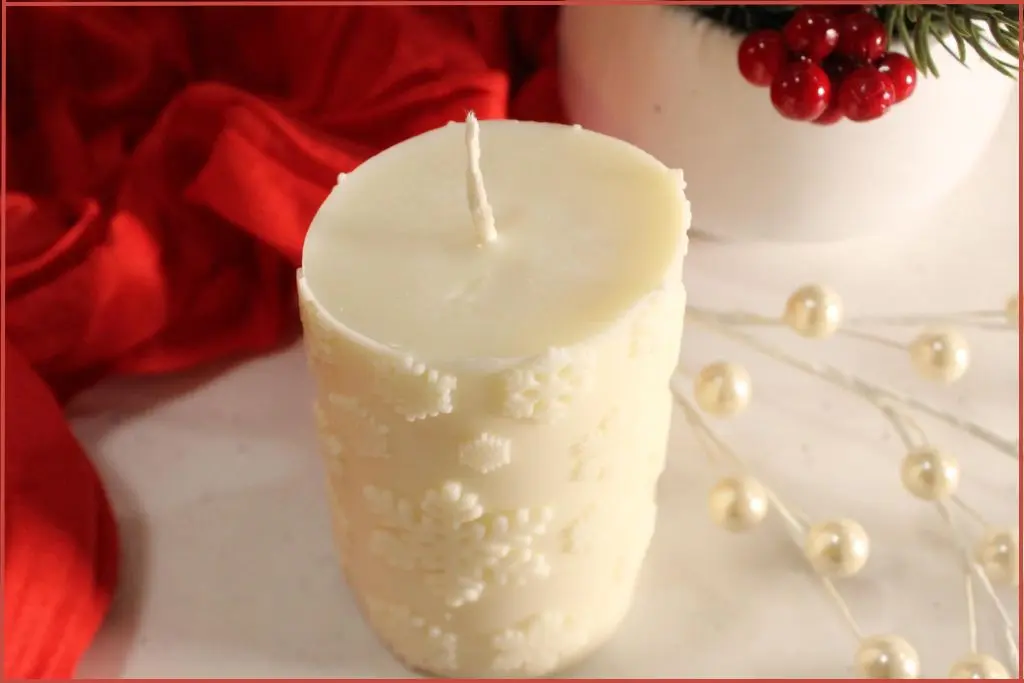
This stunning snowflake candle brings your imagination to life. Assorted snowflakes adorn a beautiful pillar candle, while pure essential oils emit a delightful aroma, providing a visual and olfactory treat for the senses.
✨ Get 12 Free Holiday Diffuser Blends — Printable PDF
Instantly make your home smell like Christmas with these festive, ready-to-use recipes.
It’s surprisingly easy to make a snowflake candle using a silicone mold and natural soy wax. The process is immensely satisfying, and the end result is pure perfection.
Along with step-by-step instructions, you’ll find tips for success and troubleshooting tips that will help you achieve professional-looking results even if this is your first attempt at candle-making.
Plus, I’m sharing two signature essential oil blends that capture the essence of the holiday season.
Affiliate Disclosure: Some links on this site are affiliate links. I may earn a small commission if you purchase through them, at no extra cost to you. See the full affiliate disclosure.
Table of Contents
What You’ll Need To Make A Snowflake Candle
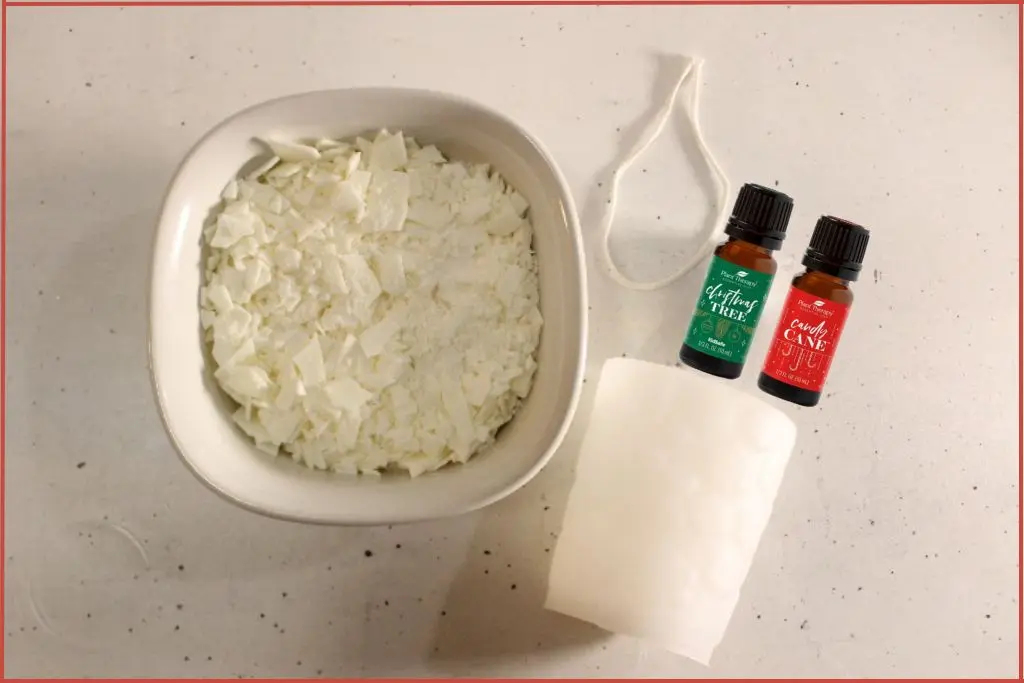
Materials
- 1 ½ cups Soy Wax Flakes
- Snowflake Silicone Candle Mold
- 75 drops Essential Oils (see blend options below)
- 1 Cotton Candle Wick
- Wick Holder or Popsicle Stick
Equipment
- Double boiler or heat-safe glass bowl over a pot
- Candle thermometer
- Wooden spoon or silicone spatula for stirring
- Scissors for trimming the wick
- Newspaper or protective covering for your workspace
How To Make A Snowflake Candle Step-by-Step
Step 1: Prepare Your Workspace
Before you begin melting wax, set yourself up for success.
Gather all your materials and equipment within easy reach. Having everything prepared makes the process smooth and enjoyable.
Cover your work surface with newspaper or a protective mat, as wax can be difficult to remove from surfaces.
Inspect your snowflake silicone mold to ensure it’s clean and completely dry. Moisture is the enemy of candle-making. It affects how the candle sets and makes it difficult to release from the mold.
Step 2: Melt the Soy Wax
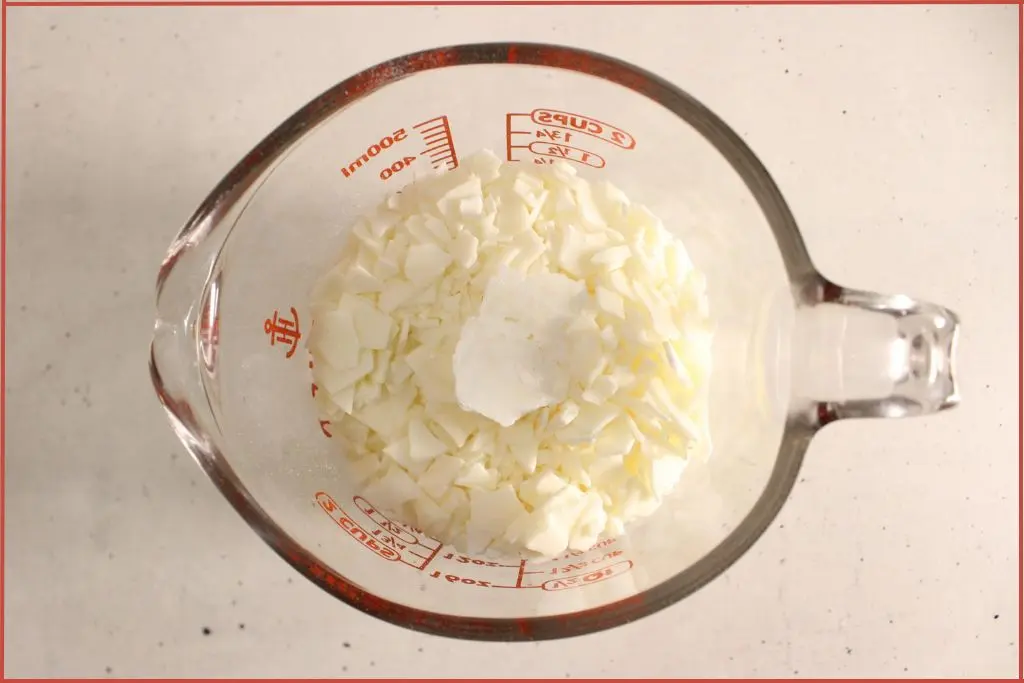
Fill the bottom pot of your double boiler with about 2 inches of water and bring it to a gentle simmer over medium heat. Place the top pot or heat-safe bowl over the water, making sure the bottom doesn’t touch the water directly.
Add 1 ½ cups of soy wax flakes to the top pot. Stir occasionally with a wooden spoon or silicone spatula as the wax melts.
Soy wax has a low melting point, so this process typically takes 10-15 minutes. The wax is fully melted when it becomes completely clear and liquid with no remaining flakes.
Safety tip: Keep the heat at medium or medium-low to prevent overheating. Do not leave melting wax unattended.
Step 3: Cool and Add Essential Oils
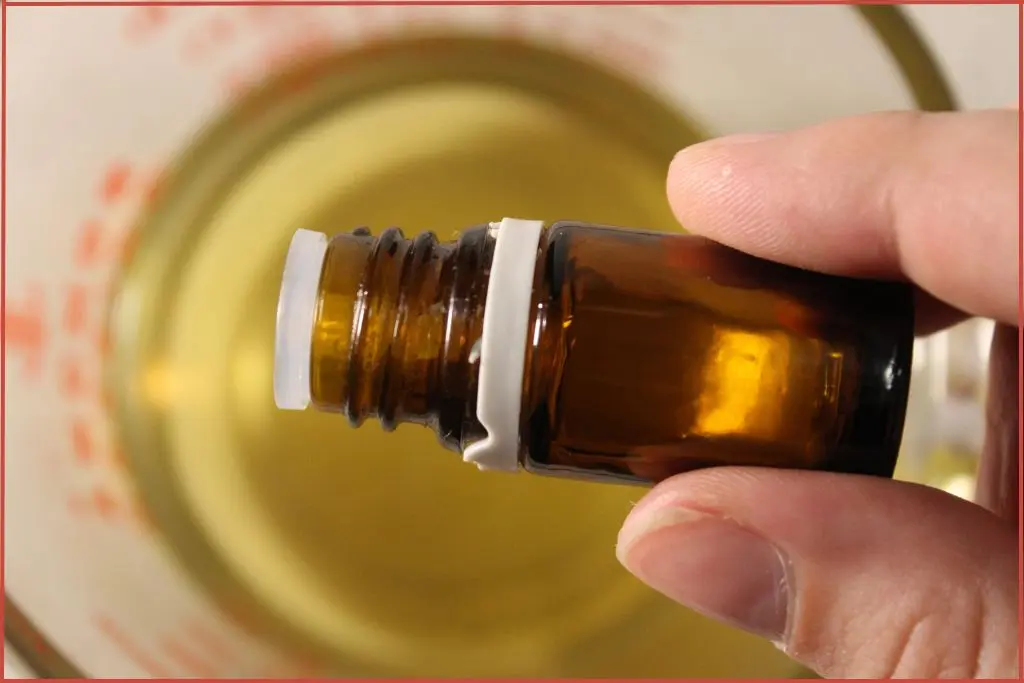
Cooling the wax is crucial for preserving the aromatic properties of your essential oils.
Once the wax is fully melted, take it off the heat and let it cool to 125-130°F. Use your thermometer to check the temperature.
If you don’t have a thermometer, wait about 5-7 minutes after removing from the heat.
Add your chosen essential oil blend to the wax while it is slightly cool but still melted.
Pour the oils directly into the wax and stir gently but thoroughly for about 30 seconds to ensure even distribution. You should notice the beautiful aroma filling your workspace.
Why temperature matters: Adding essential oils to wax that’s too hot can cause the volatile aromatic compounds to evaporate, resulting in a weaker scent. The 125-130°F range is the sweet spot for optimal scent retention.
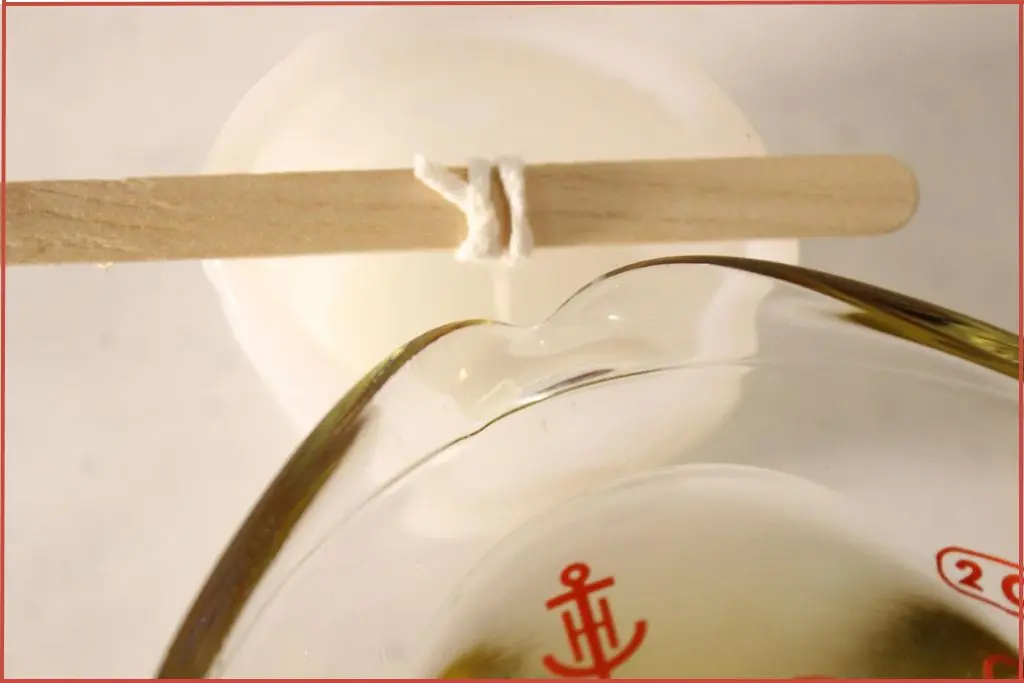
Step 4: Secure the Wick

Attach the metal tab end of the wick to the bottom of the mold using a small piece of tape and tie the top around the wick holder or popsicle stick.
Lower the wick into the mold, adjusting it until it hangs straight down through the center.
The wick holder or popsicle stick should rest across the top of the snowflake mold, keeping the wick perfectly centered and straight as the wax hardens. This ensures an even burn when you light your snowflake candle.
Tip: Ensure the wick is not too loose. It should be slightly taut and hang straight down through the center of the mold.
Step 5: Pour The Wax Into The Mold
Carefully pour the scented wax into your prepared mold. Pour slowly and steadily to prevent air bubbles from forming.
Fill the mold, leaving just a small space at the top if your mold has a rim.
As you pour, you’ll see the beautiful snowflake details on the inner side of the mold beginning to fill. The wax may appear slightly cloudy as it starts to cool, which is completely normal for soy wax.
Pro tip: If you do notice air bubbles, gently tap the sides of the mold a few times to help them rise to the surface.
Step 6: Cure And Unmold
Patience is key in this final step. Allow your candle to cure undisturbed for at least 8-12 hours, preferably overnight. Soy wax needs this time to harden completely and develop its characteristic creamy appearance.
You’ll know your candle is ready when it’s solid and cool to the touch. The wax will have pulled slightly away from the edges of the silicone mold, making removal easy.
To unmold, gently flex and peel back the silicone mold, working your way around the candle. The flexibility of silicone makes this process simple, and your snowflake details should release beautifully intact.
Remove the popsicle stick and trim the wick to about ¼ inch above the top of the candle.
Your snowflake candle is now ready to display and enjoy!
Tips For Success When Making A Snowflake Pillar Candle
Mind the temperature: Use a thermometer for best results. This is the single most important factor in achieving a smooth finish and strong scent throw.
Why soy wax is ideal: Soy wax is natural, renewable, burns cleaner than paraffin, and holds essential oils beautifully. It also releases from silicone molds more easily than other wax types.
Preventing frosting: Soy wax naturally develops a frosted or crystalline appearance, especially in cooler temperatures. This is completely normal and doesn’t affect candle performance. If you prefer a smoother finish, you can gently warm the surface with a heat gun for a few seconds.
Dealing with sinkholes: If you notice a depression forming in the center as your candle cools, you can save a small amount of melted wax and do a second pour to fill it once the candle has partially set.
Store correctly: Keep your finished candles away from direct sunlight and heat sources to preserve both the wax quality and essential oil potency.
Troubleshooting Common Issues
Even experienced candle makers encounter challenges. Here’s how to resolve the most common problems:
Sinkholes or Cavities Form
Problem: A depression forms in the center or around the wick as the candle cools.
Solution: Save about ¼ cup of your scented wax in the double boiler. Once your candle has cooled for about an hour and you notice a sinkhole forming, reheat the reserved wax to 130°F and carefully pour it into the depression to fill it level. This is called a “relief pour.”
Rough or Bumpy Surface
Problem: The top of your candle has an uneven, pebbled texture.
Solution: This happens when the wax cools too quickly. Pour your wax at the proper temperature (125-130°F) and avoid moving the mold during cooling. If your room is very cold, consider placing the mold in a slightly warmer spot away from drafts.
Weak or No Scent Throw
Problem: Your candle doesn’t smell as strong as expected when burning.
Solution: This usually means the wax was too hot when you added essential oil, causing it to evaporate. Or it could be that the candle needs more curing time.
Always add oils at 125-130°F and let your candle cure for 3-5 days before burning. If the problem persists, you may need to add more drops of essential oil next time.
Air Bubbles in the Candle
Problem: Small bubbles are visible throughout the wax or trapped in snowflake details.
Solution: Pour slowly and steadily to minimize air incorporation. If bubbles appear, gently tap the mold on your counter several times right after pouring. For stubborn bubbles, use a toothpick to pop them while the wax is still liquid.
Candle Won’t Release from Mold
Problem: The candle is stuck and won’t come out of the silicone mold.
Solution: Make sure your candle is completely cooled (at least 8 hours). To speed up the process, pop it in the freezer for 15-20 minutes – the wax will contract slightly. Then gently flex and peel the silicone mold away from the candle rather than trying to pull the candle out. Work slowly around all edges.
Wet Spots (Wax Pulling Away from Mold)
Problem: You notice gaps or wet-looking spots where the wax has separated from the silicone.
Solution: This is actually normal with soy wax and silicone molds – it’s a sign that the candle is ready to unmold! These aren’t defects.
However, if it bothers you aesthetically, try pouring your wax at a slightly cooler temperature (120-125°F) or warming your mold slightly before pouring.
Frosting or White Film
Problem: A white, crystalline coating appears on the surface.
Solution: This is natural with soy wax and indicates you’re using pure soy! It’s not a defect. I love the frosted look. It enhances the winter snowflake theme!
If you prefer a glossy finish, gently warm the surface with a heat gun held 6-8 inches away, moving constantly.
Off-Center Wick
Problem: Your wick isn’t perfectly centered after the candle has hardened.
Solution: Placing your wick and wick holder correctly is key to preventing this problem. Take care to balance the popsicle stick evenly across the mold opening.
If you discover the off-center wick after unmolding, you can carefully remelt the candle and try again, or simply trim and burn the candle as-is. Slightly off-center wicks usually still burn fine in pillar candles.
Candle Cracking
Problem: Small cracks appear on the surface or sides.
Solution: This occurs when wax cools too rapidly or experiences temperature shock. Avoid placing your mold in very cold areas or near drafts. Let candles cool at room temperature naturally. Small surface cracks are cosmetic and won’t affect burning.
Essential Oil Blend For Homemade Snowflake Candle
The beauty of making your own candles is customizing the scent to match your mood and preferences.
Here are two carefully crafted blends perfect for the Christmas season:
Snowfall Serenity Blend
Scent Profile: Fresh, calming, crisp winter forest
- 30 drops Eucalyptus
- 25 drops Lavender
- 20 drops Spearmint
This blend creates a refreshing, spa-like atmosphere that brings the peaceful essence of a snow-covered forest indoors. The eucalyptus provides an invigorating coolness, lavender adds calming floral notes, and spearmint delivers a crisp minty finish. It’s perfect for creating a tranquil holiday ambiance.
Sugar Snowflake Blend
Scent Profile: Sweet, festive, cozy warmth
- 30 drops Vanilla Oleoresin
- 25 drops Spearmint
- 20 drops Sweet Orange
This blend captures the comforting warmth of holiday baking and festive cheer. The vanilla provides a sweet, cozy base, while spearmint adds a refreshing twist, and sweet orange brings bright, uplifting citrus notes. It’s like Christmas morning in candle form.
Feel free to experiment with your favorite essential oils. Aim for a total of 60-80 drops for this candle size. Popular holiday options include cinnamon leaf, pine, cedarwood, frankincense, and peppermint.
Homemade Pillar Candle Creative Variations and Customization Ideas
Play With Colors
For a pure, snowy look, keep your candle natural white. If you’d like to add subtle color, add:
- A tiny amount of blue mica for an icy blue tint
- Silver mica for a shimmering effect
- Natural candle dye chips (use sparingly)
Mix any colorants into the melted wax before adding essential oils.
Explore Different Essential Oil Blends
While the featured blends are perfect for Christmas, you can adapt this project for general winter ambiance:
- Frosty Pine: 35 drops pine, 25 drops cedarwood, 15 drops peppermint
- Cozy Cabin: 30 drops cedarwood, 25 drops cinnamon leaf, 20 drops sweet orange
- Winter Citrus: 35 drops sweet orange, 25 drops grapefruit, 15 drops rosemary
Experiment With Assorted Shapes & Sizes
Once you master this technique, explore other winter-themed molds such as Christmas trees, stars, or ornaments. Adjust your wax amount accordingly based on mold size.
Ideas For Displaying Your Snowflake Candle
Your handmade snowflake candle deserves a beautiful presentation that highlights its intricate details and complements your Christmas decor.
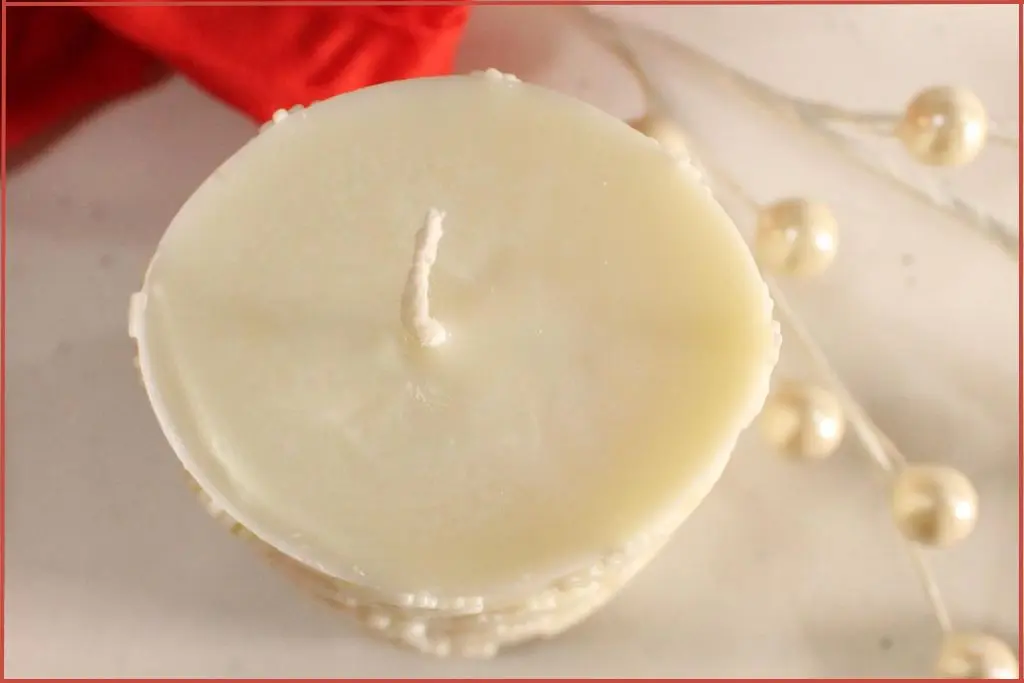
Creating a Holiday Vignette: Arrange your candle on a decorative tray or wooden board alongside fresh evergreen sprigs, small pinecones, and pearl accents (just like in the photo). The natural greenery enhances the aromatherapy experience while the pearls add elegant holiday sparkle.
Mantel Display: Group multiple snowflake candles of varying heights on your mantel, interspersed with garland and string lights for a magical effect.
Table Centerpiece: Place your candle on a mirror or glass plate to reflect the candlelight and amplify the cozy ambiance during holiday dinners.
Bathroom Spa: Create a relaxing retreat by displaying your Snowfall Serenity candle in the bathroom with fluffy white towels and eucalyptus bundles.
Gift Presentation: Nestle your candle in a gift box filled with crinkled paper, add a box of matches tied with twine, and include a small card with lighting instructions and the essential oil blend details.
Homemade Christmas Gift Set Ideas With Snowflake Candles

Your handmade snowflake candle becomes even more special when paired with other DIY creations for thoughtfully curated gift sets.
Here are three beautiful combinations that show you care:
Winter Pampering Gift Set
Create the ultimate self-care package perfect for anyone who deserves some relaxation this holiday season:
- Snowflake Candle: Choose Snowfall Serenity blend for spa vibes
- Candy Cane Lip Balm: Festive lip care with peppermint
- Gingerbread Whipped Body Butter: Rich, cozy moisturizer
- Christmas Tree Sugar Scrub: Fresh scented exfoliant
- Christmas Roll-On Perfume with Essential Oils: Natural and refreshing
Package these in a decorative basket with a soft hand towel, tie with a luxurious ribbon, and include a tag that says “Winter Pampering Essentials.”
The winter pampering gift set is perfect for teachers, coworkers, or anyone who needs encouragement to take time for themselves.
Spa Night Essentials Gift Set
Give the gift of a complete at-home spa experience with this luxurious collection:
- Snowflake Candle: For setting the mood
- Christmas Tree Bath Bombs: Fizzy, festive fun
- Candy Cane Melt & Pour Striped Soap Bars: Beautiful and functional
- Gingerbread Sugar Scrub: Sweet exfoliation
Present this in a wire basket lined with tissue paper, or use a decorative storage box they can reuse.
Add a note with suggested spa night steps: “Light the candle, run a warm bath with a bath bomb, scrub away stress, and pamper yourself with soap made just for you.”
This gift set is perfect for new moms, busy friends, or your sister who does everything for everyone else.
Festive Home Collection Gift Set
For the home décor enthusiast or new homeowner, create an atmospheric gift set that transforms their space:
- Snowflake Pillar Candle
- Candy Cane Candle in a Jar: Classic peppermint scent
- Room Freshener Spray: Instant ambiance
- Bonus: Include a small card with diffuser blend recipes for extended aromatherapy
Arrange these in a decorative wooden crate or vintage tray that the recipient can use to display the candles right away. This set shows you understand their love for creating a cozy, welcoming home and provides everything they need to fill their space with natural, festive fragrances throughout the season.
Gift Presentation Tips
No matter which set you choose:
- Use clear cellophane wrap to showcase the beautiful items inside
- Tie with wide satin or velvet ribbon in holiday colors
- Include a handwritten note explaining what’s inside and the essential oil benefits
- Add a decorative gift tag listing the scents in each product
- Consider including a small booklet of “how to use” tips for maximum enjoyment
These curated sets show thoughtfulness and creativity far beyond store-bought gifts, and because you made them yourself, each one carries a personal touch that recipients will truly treasure.
Safety and Care Tips When Burning Soy Pillar Candles
Before Burning:
- Always trim the wick to ¼ inch before each use
- Place on a heat-resistant surface away from drafts
- Keep away from flammable materials
While Burning:
- Never leave a burning candle unattended
- Keep out of reach of children and pets
- Burn for no more than 3-4 hours at a time
- Discontinue use when ½ inch of wax remains
Extending Candle Life:
- The first burn is important – allow the wax to melt completely across the surface to prevent tunneling
- Store in a cool, dry place when not in use
- Keep the wax pool free of wick trimmings and debris
Note: These candles are decorative and contain essential oils for ambiance. The snowflake design makes them especially beautiful, so you might even choose to display yours unlit as holiday decor.
Creating your own snowflake candle with essential oils is more than just a craft project. It’s an opportunity to infuse your holiday season with intentional ambiance and natural aromatherapy. The combination of beautiful snowflake details, soft candlelight, and essential oils transforms any space into a cozy winter sanctuary.
In addition to elevating your space, these homemade snowflake candles make thoughtful, personalized gifts that show you’ve invested time and care into creating something unique.
The best part? Once you’ve mastered this simple technique, you can experiment with different molds, colors, and essential oil combinations throughout the year. Each season brings new opportunities for creativity and aromatherapy.
Ready to get started? Gather your materials, choose your essential oil blend, and enjoy the meditative process of candle making.
Pin This Project!
Save this snowflake candle tutorial to your Pinterest boards for easy reference. Perfect for holiday crafts, DIY gifts, and aromatherapy projects!
How To Make A Snowflake Candle: FAQs
My candle has a frosted appearance. What went wrong?
Nothing went wrong. Soy wax naturally develops frosting, which is a whitish, crystalline coating. It’s a sign of pure soy wax and doesn’t affect performance or scent.
How long will the scent last?
When stored properly, your essential oil-scented candle will maintain its fragrance for 6-12 months. The scent throw (how strongly you smell it) will be most noticeable when burning.
Can I use fragrance oils instead of essential oils?
While you technically can, I do not recommend it. You will be inhaling the aromatic vapors and fragrance oils contain chemicals that can be harmful. Good quality essential oils, on the other hand, are natural and nontoxic.
Can I make these candles ahead of time for gifting?
Yes! These candles actually benefit from curing for a few days before burning. Make them 1-2 weeks before gifting and store them in an airtight box for optimal scent development.
What if my candle won’t release from the mold?
Place the mold in the freezer for 15-20 minutes. The wax will contract slightly, making removal easier. Silicone molds are very flexible, so gently peeling and flexing should release even stubborn candles.
Can I reuse the mold?
Absolutely! Silicone molds are reusable. Simply wash with warm, soapy water and dry completely before your next project./