As an Amazon Associate I earn from qualifying purchases. See Full Disclosure Here
DIY reed diffusers with essential oils allow you to customize the whole package, from the choice of reed diffuser bottle and the reeds to the aroma that is diffused.
Making your own reed diffusers is a fun and simple project that allows you to express your creativity without taking up a whole lot of your time.
You can use your gorgeous, aromatic creations in your own home or give them away as gifts.
In addition to step-by-step instructions for creating your own DIY reed diffusers with essential oils, you’ll also find useful tips on how to get the most out of your homemade creations.
How To Make Your Own Reed Diffusers With Essential Oils
Things you need for a homemade reed diffuser with essential oils:
15-20 drops of your favorite essential oils or EO blends (see below for blend recipes)
1/4 cup lightweight carrier oil such as Apricot kernel oil or safflower oil
2 teaspoons Witch Hazel or alcohol
Wood bottle caps with holes in them – optional
Before discussing how to make your own reed diffuser, it helps to understand the purpose of each component.
A Look At The Individual Components + Best Options
Reed Diffuser Bottles: The best reed diffuser bottles are made of glass and have a narrow opening. Unlike plastic, glass doesn’t react with essential oils, which helps to preserve the oil’s therapeutic properties. The narrow opening helps to slow down the evaporation rate so your oils last longer.
Reed Diffuser Sticks: Reed diffuser sticks are long, slender long usually made from rattan or bamboo. These are ideal for the purpose because of their ability to absorb the oil-alcohol mixture evenly. You can choose simple reeds for a minimalist look or decorative reeds to add some flair to your creation.
Essential Oils: Make sure to buy high-quality essential oils from a reputed company only. Your choice of essential oil will depend on your preferred aroma.
Carrier oils: Adding carrier oil helps to slow down the evaporation of essential oil so it lasts longer. It is important to use a lightweight oil that will get absorbed more easily. Apricot Kernel Oil and Grapeseed Oil are the two best carrier oils for adding in your homemade reed diffuser. Using heavier oils will not work as efficiently.
Witch hazel: Witch hazel helps to dilute the oils so they can travel up the reeds more easily. Cheap vodka is a great substitute for witch hazel.
Making Your Own Reed Diffuser – Step-By-Step
Measure out ¼ cup of your chosen carrier oil in a glass measuring cup and add to the reed diffuser bottle.
Add the witch hazel or alcohol to the bottle.
Add 15- 20 drops of your preferred essential oil or blend to the bottle.
Shake gently to allow the oils to disperse properly in the alcohol.
If you’re planning on using your homemade reed diffuser right away, you can stir the contents gently with a reed stick. Then seal the bottle with the perforated cover in and insert reed sticks through the holes.
If you’re using the diffuser without the perforated cap, simply bundle the reed sticks and insert them into the neck of the bottle. Make sure the lower tips of the reed diffuser sticks are touching the liquid inside.
If you’re making reed diffusers to give away as gifts, close the bottle tightly after you’re done. Keep the reed sticks separately to be given along with the bottle.
While it does not take too much time to make your own reed diffusers, it may take a couple of hours before you will be able to get the aroma. This is because it takes a little while for the oil to travel up the reeds and get fully absorbed before giving off their scent.
Flip the reed sticks every day to keep refreshing the scent.
These DIY Reed Diffusers with essential oils are a great way to scent your entire home without using toxic chemicals. You can make your own customized reed essential oil diffusers using a variety of containers and any essential oil of your choice.
Read my detailed guide on How To Use A Reed Diffuser the right way.
Things To Keep In Mind When Making DIY Reed Diffusers
You can keep your homemade reed diffuser as simple or as elaborate as you want by simply choosing the appropriate accessories.
If you’re looking to cut costs, look for a cheap reed diffuser bottle but do not compromise on is the quality of the essential oil. Always use the best quality essential oil that you can afford so you also benefit from its therapeutic properties.
You can use either plain or decorative reed sticks for your diffuser. The reed sticks you choose will impact the overall look of your homemade reed diffuser. Plain reed sticks will give it a minimalistic look while decorative reed sticks will add flair to the overall appearance.
With regards to essential oil, you can buy blends or make your own. You’ll find plenty of recipes on my site.
How Reed Diffusers Work
It’s interesting to take a look at how reed diffusers work to disperse the aroma into the atmosphere.
When you insert the reeds into the vase or bottle, the ends of the reeds absorb the oil-alcohol mixture slowly.
As the oils get absorbed into the ends of the reeds, they travel up the reed slowly, saturating the whole length of the reed.
The saturated reeds release the aroma of the essential oil or blend into the atmosphere, scenting your room gently.
You can control the intensity of the fragrance by adjusting the number of reeds you use. Insert just 2-3 reeds if you prefer a light, subtle fragrance, and more if you want a stronger scent.
Flipping the reeds every few days will expose fresh oil to the air. The reed sticks will need to be replaced about once a month.
Best Essential Oils & Blends for Your DIY Reed Diffuser
There is no one essential oil that’s best to use in your DIY reed diffuser. When choosing your reed diffuser oil, think about the purpose you are using it for.
Are you planning on using your homemade reed diffuser to calm down after a long day, to stay more focused or to alleviate stress and anxiety?
Click the links below to get essential oil blend recipes for various purposes:
These are the best essential oils to help you sleep better, stay more focused, and calm anxiety.
You may want to use romantic essential oils and blends to set the mood in the bedroom, a cheerful diffusion blend to keep the mood bright and cheerful, or floral essential oils to fill your home with floral scents.
This reference guide to essential oils includes a list of some of the more popular essential oils and the benefits of each.
You’ll also find a nice assortment of essential oil blends that you can use in your homemade diffuser.
How to Save Money When Making Your Own Reed Diffuser With Essential Oils
You can save even more money by buying an essential oil set instead of buying individual bottles of oil. Buying an essential oil set works out much cheaper. Also, when you buy a set, you get a variety of essential oils that you can use either on their own or mix and match to create your own blends.
 My favorite essential oil set is this 7 x 7 Essential Oil Set by Plant Therapy. It is one of their most popular sets and for good reason. For a decent price, you get Plant Therapy’s top 7 single essential oils + top 7 synergies.
The 7 single oils in this set include Lavender, Lemon, Peppermint, Tea Tree, Eucalyptus, Cinnamon, and Sweet Orange.
The 7 synergies include Relax, Energy, Tranquil, Sensual, Invigor Aid, Germ Fighter, Immune Aid. This is a versatile collection of synergy blends. Each one is specially formulated to offer powerful health benefits.
The “Directions” tab on this page provides a full list of all the individual oils and synergies along with detailed instructions for how to use each of the oils and synergies on the list. This ensures that you get the full aromatherapy benefits when you use these oils in your DIY reed diffuser.
These are a few other sets that are excellent for use in your homemade Reed Diffuser:
The Relaxation Set with 3 x 10ml bottles of relaxation synergy blends, each with a different combination of essential oils. With this Relaxation Synergies Set, you get a bottle each of Tranquil, Meditation, & Relax Synergy Blends.
Wellness Set with 6 x 10ml bottles of 100% pure essential oils and synergies for different conditions. With this Wellness Set, you get a bottle each of Blues Buster, Respir-Aid, Germ Fighter, & Immune-Aid Synergy Blends, and Oregano & Eucalyptus Globus Essential Oils.
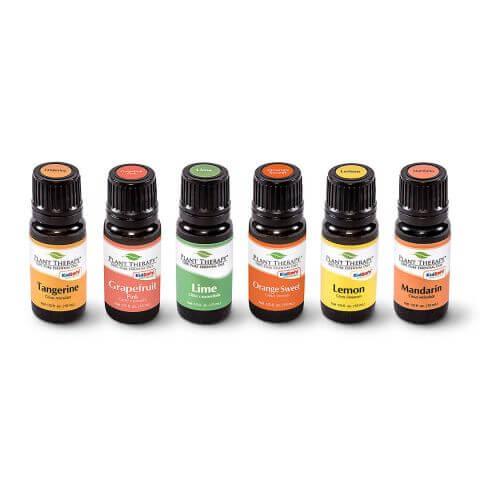
The Fruit Set with 6 x 10ml bottles of fruit-scented essential oils – Tangerine, Pink Grapefruit, Lemon, Mandarin, Sweet Orange & Lime. All of these fruity oils belong to the citrus aroma family but it’s interesting to see how each one has a distinctly different aroma.
If you are planning on keeping your Reed Diffuser in your child’s room, check out Plant Therapy’s KidSafe Organic Blends Set. This set includes 6 x 10ml bottles of Calming The Child, Nighty Night, Immune Boom, Shield Me, A+Attential, and Germ Destroyer Synergy Blends. Each of these blends is made using a different combination of oils, all from the KidSafe line of oils.
DIY Reed Diffusers as Gifts
DIY reed diffusers make great gifts for anyone and because they are so inexpensive to make, you don’t even have to wait for any occasion. Give one of your lovely homemade creations to someone just because.
To personalize it further, choose a narrow-necked bottle that would go with the décor in their home. A plain glass container may be more appropriate in a home that is done up in a minimalistic style.
If you are making these as gifts, you could choose an individual oil or a blend that resonates with the season:
Reed diffusers with Christmas Essential OIl Blends are perfect for gifting during the Holiday season.
Reed diffusers with Thanksgiving Diffuser Blends make a great thank-you gift.
You’ll find more blend recipes here for each of the four seasons:
Sizzling Summer Diffuser Blends
Refreshing Spring Diffuser Blends
Fabulous Fall Essential Oil Blends
Winter Wood & Forest Scents With Essential Oils
Prefer to buy a readymade reed diffuser as a gift? Check out the options listed below.
Best Essential Oil Reed Diffusers to Buy
In my search for Essential Oil Reed Diffusers to buy, I saw some really cool ones but on reading the description more closely I saw that they did not contain essential oils. Many of the readymade reed diffusers contained ‘fragrances’ and not pure essential oils.
There is a world of a difference between essential oils and fragrance oils. If you are looking to get the health benefits of aromatherapy, then it is important to use essential oils and not fragrance oils. While fragrance oils may smell good, they have zero health benefits.
The Essential Oil Reed Diffusers I’ve shortlisted below are all from reputed brands and they contain pure essential oils.
Chesapeake Bay Candle Reed Diffuser
Chesapeake Bay makes some of the top-rated essential oil reed diffusers on Amazon.
The Chesapeake Bay line of essential oil reed diffusers includes a wide range of options. These are part of the brand’s Mind & Body Collection.
Each diffuser is filled with a unique essential oil blend and packed into a 10-inch frosted glass diffuser. The blends are made from a combination of cinnamon, cloves, orange, lemon, eucalyptus leaf, patchouli, gardenia, cedarwood, and nutmeg oils.
The diffusers come in an array of soft pretty pastel colors. You get 10 reeds with each set.
These are some of the many scents you can choose from in the Chesapeake Bay Candle Reed Diffuser range.
Stillness & Purity
Refresh & Rejuvenate
Peace & Tranquility
Balance & Harmony
Reflection & Clarity
Love & Passion
You can also find Chesapeake Bay Candles with these same scents.
Plant Therapy Reed Diffusers
Plant Therapy has reed diffusers in two interesting aromas – Tangerine Jasmine and Wood Spice. Both smell absolutely divine. Which one is better for you will depend on what type of aroma you are looking for.
Both reed diffusers come in glass bottles with 4 ounces of Plant Therapy’s pre-diluted blend and 10 rattan sticks.
Using these reed diffusers is easy. Just insert the rattan sticks into the bottle. The oil slowly travels up the reeds and releases the aroma into the air. To refresh the scent, flip the reeds upside down so the damp ends are on top, and enjoy!
The Tangerine Jasmine Reed Diffuser will fill your space with a citrusy, floral, and spicy aroma. The blend is made up of a combination of Tangerine, Clove Bud, and Vetiver Essential Oils, along with other natural fragrances that give it a light, refreshing fruity and floral scent that’s sure to brighten any space.
The Wood Spice Reed Diffuser will scent your space with a wonderfully warm, woodsy, and spicy aroma. The blend contains a combination of Patchouli, Ho Wood, Ylang Ylang, Lemongrass, and Clove Bud Essential Oils. The result is a wonderfully warm and spicy scent that will transform your room into a cozy haven.
HOUZZ Interior Lemon Verbena Essential Oil Reed Diffuser
HOUZZ Interior is another reputed brand that offers several different essential oil reed diffusers with a wide range of aromas. Each diffuser comes with 50z. scent and 8 wavy reeds that offer maximum diffusion.
Their eco-friendly formulas are free from alcohol, phthalates, and toxins. You can choose from reed diffusers with any of these blends:
Lavender & vanilla
Lemon Zest & Verbena Blossoms
Lemongrass & ginger
Citrus & Spice
Grapefruit & Orange Blossom
Stress Relief Citrus & Mint
Did you make your own reed diffusers with essential oils or did you buy one for yourself or as a gift? Which was your favorite scent? Share your experience with making and using reed diffusers in the comments below.

Disclaimer: This information is not intended to serve as medical advice. Please consult your physician before using essential oils. Read Full Disclaimer here.


