Understanding how to use an essential oil diffuser correctly is key to maximizing the benefits of aromatherapy.
Let me start by saying this – using the device itself is easy.

✨ Get 12 Free Holiday Diffuser Blends — Printable PDF
Instantly make your home smell like Christmas with these festive, ready-to-use recipes.
All essential oil diffusers come with a manual illustrating step-by-step instructions on using that particular model, so you can’t go wrong regardless of the type of diffuser you buy.
However, there’s more to using a diffuser for essential oils than just the basic how-to instructions.
It’s important to dig deeper and understand how each type of diffuser works. This makes it easier to determine how to use an essential oil diffuser correctly and what mistakes to avoid.
This will help you get the maximum benefits of the essential oil you add to your device while avoiding any mishaps.
Table of Contents
Affiliate Disclosure: Some links on this site are affiliate links. I may earn a small commission if you purchase through them, at no extra cost to you. See the full affiliate disclosure.
How Do Essential Oil Diffusers Work?
Diffusers break down the essential oils into tiny particles and release them into the air slowly, allowing you to easily inhale the aromatic molecules in small quantities consistently.
The diffusing process fills the space with a pleasant fragrance and helps us get the therapeutic benefits of the oils through inhalation.
There are different types of diffusers for essential oils. Each type works differently and each type offers unique benefits. The way to use the different types of diffusers varies too.
Learning how to use an essential oil diffuser will help you get the most out of your essential oils. I break it down with details on how to use each type of device.
How To Use An Ultrasonic Diffuser
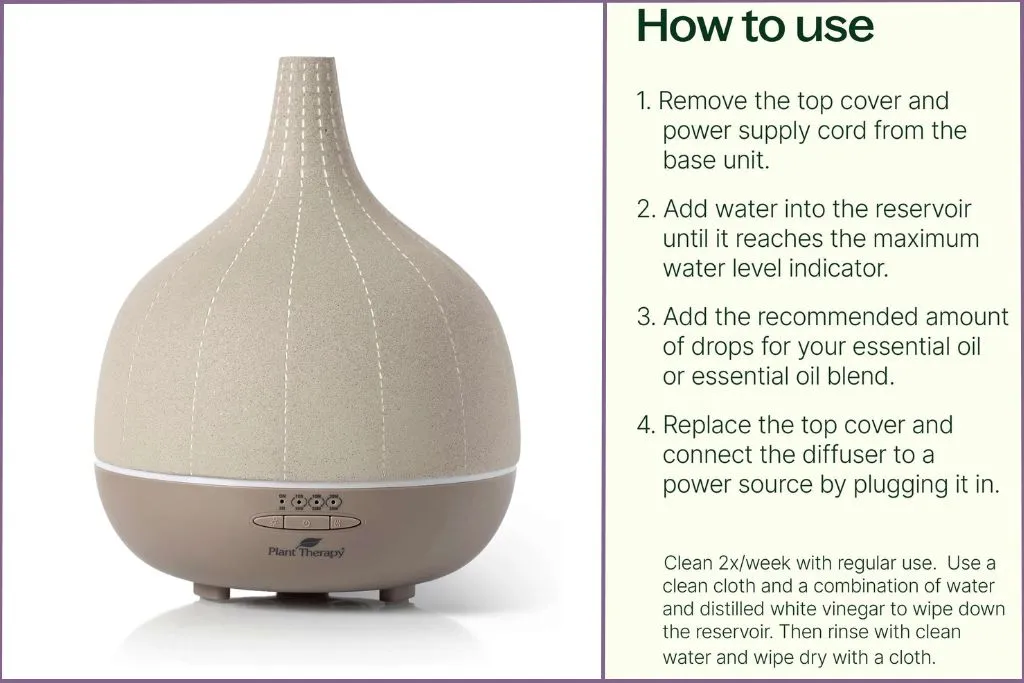
How An Ultrasonic Diffuser Works
An ultrasonic diffuser uses ultrasonic technology, which involves high-frequency vibrations to create a fine, cool mist of water and essential oils.
A small ceramic disc built into the device vibrates at an ultrasonic frequency—typically around 1.7 million times per second.
This vibration breaks down the water and essential oils into tiny particles, creating a mist that is then dispersed into the air.
The water in the diffuser also helps to add moisture to the air, making ultrasonic diffusers a great choice for humidifying dry indoor environments.
Step-by-Step Guide To Using An Ultrasonic Diffuser

1. Add Water To The Water Tank
Remove the top cover of the diffuser to access the water tank, which is usually at the bottom of the device.
Look for the maximum fill line marked inside the water tank and pour clean, room-temperature distilled water up to this fill line. Do not overfill, as this can prevent the diffuser from working properly.
Distilled or filtered water is often recommended to prevent mineral buildup inside the diffuser.
2. Add Essential Oils
After adding water to the tank, add your favorite essential oil or blend directly into the water.
The number of drops may vary based on the tank size and your desired aroma strength. Use fewer drops for a milder scent and more drops for a stronger scent
Read this detailed breakdown of how many drops to add to an essential oil diffuser.
3. Set the Timer & Mist Output
Replace the cover, adjust the settings, and plug in the diffuser.
Most ultrasonic diffusers come with multiple timer settings, allowing you to choose how long you want the diffuser to run. Common options include 1 hour, 3 hours, 6 hours, or continuous operation.
Many models have an adjustable mist output setting. Select a low or high mist setting depending on how much scented mist you want in the air. If your device has light settings, adjust those too.
Car essential oil diffusers typically operate using ultrasonic diffusion. They are generally smaller in diameter and can fit into the vehicle’s cup-holder.
Ultrasonic Diffuser Cleaning & Maintenance Tips
Regular cleaning is important to keep your ultrasonic diffuser running smoothly and to prevent the buildup of oils and minerals. After each use, empty any remaining water and gently wipe the inside of the tank with a soft cloth.
Deep clean the diffuser after every few uses by filling the tank with water and adding a tablespoon of white vinegar. Run the diffuser for 5-10 minutes to allow the vinegar to clean the inside components. Then, empty the tank and rinse it thoroughly with clean water.
How To Use A Nebulizing Diffuser

How A Nebulizing Diffuser Works
Nebulizing devices are the most powerful type of diffusers for essential oils. They don’t use water, which dilutes the oil, or heat, which damages the volatile components of the oil.
A nebulizing diffuser operates using a small, powerful air pump that creates a stream of pressurized air.
This air is forced through a small tube in the diffuser’s glass reservoir, creating a vacuum.
The vacuum pulls the concentrated essential oil up from the reservoir and atomizes it into micro-particles, which are then released into the air as a fine mist.
Because the oils are not diluted, their therapeutic properties are preserved and delivered in their most concentrated form, allowing you to experience the full potency and aroma of essential oils.
This detailed Organic Aroma article on how nebulizing diffusers work and how to use them is worth a read.
Step-by-Step Guide to Using a Nebulizing Diffuser
1. Assemble the Diffuser
Nebulizing diffusers usually come with a few parts that must be assembled before use.
Begin by carefully attaching the glass reservoir to the base of the diffuser. Ensure that it is securely in place to prevent any spills or damage.
Some nebulizers also have a separate glass nozzle that should be attached to the top of the reservoir.
2. Add Essential Oils Directly Into the Glass Reservoir
Once assembled, add your chosen essential oil directly into the glass reservoir.
Typically, you’ll need about 10-20 drops of essential oil, depending on the size of the reservoir and the desired intensity of the aroma.
Since the oils are undiluted, be mindful of the amount you add, as the aroma emitted can be quite strong.
3. Adjust the Intensity of the Diffusion
Most nebulizing diffusers come with an adjustable intensity setting, allowing you to control the strength of the aroma. You can increase or decrease the diffusion rate by turning a dial or adjusting a switch on the diffuser.
Start with a lower setting and gradually increase it until you reach the desired intensity. Remember, nebulizing diffusers can be quite powerful, so a little goes a long way.
Nebulizing Diffuser Cleaning & Maintenance Tips
Nebulizing diffusers must be cleaned regularly, as the glass components can become clogged with residue from the essential oils. This can prevent the device from working efficiently.
To clean, disassemble the diffuser and rinse the glass reservoir and nozzle with a small amount of rubbing alcohol. This helps to dissolve any oil residue and prevents clogging. Avoid using water or harsh chemicals, as these can damage the delicate glass parts.
Let the glass components air dry completely before reassembling the diffuser.
How To Use A Passive Diffuser

How A Passive Diffuser Works
Passive diffusers are among the simplest and most natural methods for enjoying the benefits of essential oils. The downside is you cannot control the amount of scent dispersed.
Unlike other types of diffusers that use water, heat, or air to disperse oils, passive diffusers rely on the natural evaporative process.
The essential oils are absorbed into a porous material, such as clay, wood, or lava stone, and then gradually evaporate into the air, releasing their aroma over time.
Passive diffusion works by allowing the essential oil molecules to slowly escape into the air as they evaporate from the surface of the material.
Because this process doesn’t require any external power source or moving parts, passive diffusers are silent, maintenance-free, and ideal for small spaces or personal use. They double perfectly as portable diffusers for aromatherapy on-the-go.
Types of Passive Diffusers
There are a few different types of passive diffusers based on the material they are made from. Clay, lava stone, terracotta, and wood are the most common materials used in passive diffusers
All work on the same principle of passive diffusion, but there are differences in how to use each type.
You’ll find detailed instructions on how to use different types of passive diffusers in this guide.
Here’s an overview of the same:
Step-By-Step Guide To Using A Passive Diffuser
1. Add Essential Oils to the Passive Diffuser Material
Add 1-2 drops of essential oil directly onto the passive diffusing material.
Give the material time to absorb the essential oil before it can start releasing the aroma.
2. Place the Diffuser in the Desired Location
Place the passive diffuser where it can slowly release its scent into the surrounding space. Do not place near a fan or open window.
Passive diffusers can be placed on a desk or bedside table in a car, office, or small room where you want to enjoy the scent. They are ideal for use in smaller enclosed spaces, where the aroma can accumulate.
Lava stone jewelry is portable and allows you to enjoy the benefits of essential oils wherever you go. Wear it around your wrist or neck to keep the fragrance close by throughout the day.
Passive Diffusers Cleaning & Maintenance Tips
Passive diffuser materials may accumulate residue over time, especially if you switch between different essential oils.
To clean, simply rinse the material with warm water and let it air dry. Avoid using soap, as it can be absorbed into the material and compromise the properties and aroma of the oil.
How To Use An Evaporative Diffuser

How Evaporative Diffusers Work
Evaporative diffusers are a simple and natural way to disperse essential oils into the air.
These diffusers rely on the natural process of evaporation, where essential oils are absorbed into a material—such as a pad, reed, or filter—and then evaporate into the air as they come into contact with airflow.
In an evaporative diffuser, essential oils are placed on or in a material that allows them to gradually evaporate into the air. As the oil evaporates, its molecules are dispersed throughout the room, releasing the aroma.
Types of Evaporative Diffusers
There are different types of evaporative diffusers based on design and how they work. The most common types of evaporative diffusers are fan diffusers, reed diffusers, and personal inhalers
All work on the same principle of evaporation, but there are small differences in how to use each type.
Step-By-Step Guide To Using An Evaporative Diffuser
1. Set Up the Diffuser
Place the diffuser on a flat, stable surface where it won’t be knocked over.
Choose a location away from direct sunlight or drafts, as these can affect the evaporation rate.
2. Add Essential Oils To The Pad Or Reeds
How to Use a Fan Diffuser: Add a few drops of essential oil onto the pad or filter. The number of drops depends on the size of the pad and your desired scent strength. Reassemble the diffuser, ensuring the pad is securely in place.
How to Use a Reed Diffuser: Fill the container with your essential oil or a blend of oils. Insert the reeds into the container, and allow them to soak up the oil for a few minutes. For a stronger scent, flip the reeds after they have soaked up some of the oil. Get a detailed breakdown of how to use a reed diffuser.
Want to make your own reed diffuser for essential oils? See how easy it is!
3. Position the Diffuser for Optimal Airflow
Place the fan diffuser in an area with good airflow, such as near an open window or in a space where air circulates freely. This will help to spread the aroma more effectively throughout the room.
Place the reed diffuser in a central location in the room where it can continuously release the fragrance. You may need to rotate or flip the reeds periodically to maintain a consistent scent.
Evaporative Diffuser Cleaning & Maintenance Tips
Fan diffusers require regular cleaning to ensure optimal performance.
Reed diffusers don’t require much maintenance, but you may want to replace the reeds every few months as they can become saturated and less effective over time.
Whether you prefer the simplicity of a reed diffuser or the portability of a fan diffuser, evaporative diffusers offer a natural and easy way to enjoy the benefits of essential oils.
How To Use Heat Diffusers

How A Heat Diffuser Works
Heat diffusers use heat to accelerate evaporation, allowing the essential oils to disperse more quickly throughout a room.
The heat source can vary, from a simple candle flame to an electric heating element, each offering different levels of control over the diffusion process.
When heat is applied to the essential oils, it causes the oil’s molecules to move faster, which leads to evaporation. The evaporated oil then diffuses into the air, filling the room with its fragrance.
While heat diffusers are effective at spreading aroma, there is a downside that you should know High temperatures can alter the chemical structure of essential oils, potentially reducing their therapeutic benefits.
Using an essential oil diffuser that does not use heat is the best option to preserve the integrity of the oils.
Types of Heat Diffusers
Candle Diffusers: These traditional diffusers use a small tealight candle placed beneath a ceramic or glass dish that holds the essential oils. The heat from the candle warms the dish, causing the oils to evaporate.
Electric Heat Diffusers: These diffusers use an electric heating element to warm the essential oils. They are convenient, as they don’t require an open flame, making them safer for use in households with children or pets. They also offer more control over the temperature, allowing for a more consistent diffusion.
Step-by-Step Guide to Using a Heat Diffuser
1. Add Essential Oils to the Diffuser Dish
For candle diffusers, fill the dish with water and then add a few drops of your chosen essential oil to the water. The water helps to moderate the temperature and prevent the oils from burning too quickly. The number of drops can vary depending on the size of the dish and your desired scent intensity, but 5-10 drops is a good starting point.
For electric heat diffusers, you may not need to add water, depending on the design. Simply add the essential oil directly to the dish or pad as directed by the manufacturer. Some electric diffusers have replaceable pads that you can soak with essential oils.
2. Use the Heat Source Safely
Candle diffusers: Place the tealight candle in its holder beneath the dish and light it. Make sure the candle is stable and the device is placed on a heat-resistant surface away from flammable materials. Never leave the candle unattended while it’s burning.
Electric heat diffusers: Plug the device into an electrical outlet and switch it on. Follow the manufacturer’s instructions regarding temperature settings, if applicable. Always place the diffuser on a flat, stable surface to prevent spills or overheating.
3. Monitor the Diffuser While in Use
It’s important to monitor heat diffusers while in use. For candle diffusers, check periodically to ensure the water hasn’t evaporated completely. If the water level gets too low, the oils may overheat and burn, diminishing their effectiveness and potentially releasing unpleasant odors.
For electric heat diffusers, monitor the temperature and avoid running the diffuser for extended periods, as this can cause the oils to degrade. Some models have automatic shut-off features that help prevent overheating.
Heat Diffuser Cleaning & Maintenance Tips
Candle diffusers require regular cleaning to remove any oil residue or burnt-on deposits. After each use, allow the diffuser to cool completely, then empty any remaining water, and wipe the dish with a soft cloth.
Electric heat diffusers also need periodic cleaning. If the diffuser uses pads, replace them regularly as they become saturated with oil. Clean the dish or pad holder with a damp cloth to remove any oil buildup.
Mistakes to Avoid When Using An Essential Oil Diffuser

These are a few common mistakes to avoid when using an aromatherapy diffuser:
1. Overloading with Essential Oils
It can be tempting to add extra drops of essential oil to intensify the scent, but this can backfire. Overloading your diffuser with too much oil can result in an overpowering aroma that may cause headaches or irritation.
Additionally, excess oil can build up inside the diffuser, leading to clogs or damage.
Stick to the recommended number of drops—usually 5-10 per 100ml of water—and adjust gradually based on your preferences and the device’s capacity.
2. Using the Wrong Type of Essential Oils
Not all essential oils are suitable for every type of diffuser. Thicker oils, such as vetiver, patchouli, or sandalwood, can clog ultrasonic diffusers or cause them to malfunction.
Check your device’s manual to see if there are any specific oils it’s not compatible with. If it does not mention any oil, you’re good to go.
3. Ignoring Cleaning Instructions
Cleaning your diffuser regularly is crucial to maintain its performance and longevity.
Neglecting this step can lead to residue build-up, which can affect the quality of the mist and the scent. It can also lead to mold growth in the water tank, which is not only unpleasant but can also pose health risks.
Follow the manufacturer’s instructions for cleaning, typically involving wiping down the inside of the tank and running a vinegar-water solution through the diffuser periodically.
Learn how to clean an essential oil diffuser with and without vinegar.
3. Using Tap Water Instead of Distilled Water
While many diffusers can function with tap water, it’s best to use distilled or purified water.
Tap water contains minerals that can build up in the diffuser over time, leading to deposits that may affect performance or shorten the device’s lifespan.
Distilled water helps prevent this build-up, ensuring your diffuser stays in good working order for longer.
4. Running the Device for Too Long
It’s easy to forget to turn off your diffuser, especially if it doesn’t have an automatic shut-off feature. Running the diffuser too long can waste essential oils and potentially strain the unit.
To avoid this, set a timer or choose a diffuser with a built-in timer or auto shut-off function. This way, you can enjoy the benefits of aromatherapy without worrying about overuse.
5. Placing the Diffuser in the Wrong Location
Where you place your diffuser can impact its effectiveness. Avoid placing it near open windows, vents, or fans, as the airflow can disperse the essential oils too quickly, diminishing their scent.
Similarly, placing the diffuser on an unstable surface can cause it to vibrate or tip over, leading to spills.
Choose a flat, stable surface in a central location to allow the mist to disperse evenly throughout the room.
6. Overlooking the Effects on Kids & Pets
Some essential oils are unsafe for pets or small children, so it’s important to be mindful of who is in the room when diffusing.
For example, oils such as tea tree, eucalyptus, and peppermint can be toxic to pets if inhaled in large quantities.
Always research the safety of each oil before using it in a household with pets or young children, and consider using a diffuser in a well-ventilated area or where they do not have direct access.
By avoiding these common mistakes, you can ensure that your essential oil diffuser operates effectively and safely, providing you with the full benefits of aromatherapy.
Safety Considerations When Using An Essential Oil Diffuser
While essential oil diffusers are generally safe to use, there are a few important safety tips to keep in mind:
- Use only high-quality, pure essential oils in your device.
- Don’t leave your diffuser unattended.
- Keep the device out of reach of children and pets.
- Diffusing essential oils is the easiest and most convenient way to get the benefits of essential oils.
Learning how to use, where to place, how many drops to use in your diffuser, and other safety considerations will help you get the maximum benefits without the risks.
FAQs On How To Use An Essential Oil Diffuser
Are essential oil diffusers safe to use?
Yes, aromatherapy diffusers are safe to use provided you use your device according to the manufacturer’s instructions. If you have two different types of diffusers, follow the specific guidelines for each.
Do I need to empty out the water after each use?
Not necessarily. If you’re using your device regularly, you need to empty the water after few uses. Do not let the water sit in the tank for too long as this can damage the system.
Can I mix different essential oils in my device?
Yes, you can mix different essential oils to create unique blends. Be sure to follow the recommended dilution ratios for each oil and adjust the number of drops accordingly.
Can I use tap water in my diffuser?
It’s best to use filtered or distilled water in your diffuser to avoid any mineral buildup or potential damage to the unit.
Can I use fragrance oils in an essential oil diffuser?
Technically yes, but you should know that fragrance oils are not the same as essential oils. Unlike essential oils, which are 100% natural, fragrance oils contain a large percentage of synthetic chemicals. Inhaling these vapors can be toxic.
How long should I run my diffuser for?
Most diffusers have different timer settings ranging from 1-3 hours, or you can run it continuously until the water runs out. Follow the manufacturer’s instructions for the specific diffuser you have.
Can I use my diffuser in any size room?
You can, but it’s best to use a diffuser for large rooms when diffusing essential oils in a large space to disperse the aroma over the entire area. A small diffuser may not be as effective.
You can use any type of essential oil diffuser for smaller rooms including a reed diffuser or a passive diffuser.
Read List Of Essential Oils & Their Uses: A Reference Guide to choose the right essential oil for your device.
Don’t want to buy an aroma diffuser? 30 Ways To Use Essential Oils Without A Diffuser

