This rose garden candle combines the warm glow of a hand-poured soy candle with the timeless beauty of blooming flowers, creating a stunning centerpiece that’s almost too pretty to burn (but please do – it’s meant to be enjoyed!).

✨ Get 12 Free Holiday Diffuser Blends — Printable PDF
Instantly make your home smell like Christmas with these festive, ready-to-use recipes.
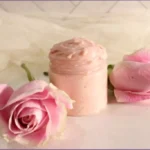
There’s something incredibly enchanting about a scented candle adorned with delicate wax roses in soft shades of pink and red.
While this candle makes a lovely romantic gift for Valentine’s Day, anniversaries, and engagements, its elegant floral design is perfect year-round. Display it in your bedroom, bathroom, or living room for a touch of romance any day of the week.
The best part? This project is surprisingly beginner-friendly and requires just a few simple supplies.
In this step-by-step tutorial, I’ll show you how to create a soy wax rose garden scented candle from start to finish. I’ve also included tips for achieving a perfect pink hue, arranging the wax flowers like a pro, and resolving common issues that come up when making scented soy candles.
Table of Contents
Affiliate Disclosure: Some links on this site are affiliate links. I may earn a small commission if you purchase through them, at no extra cost to you. See the full affiliate disclosure.
Why You’ll Love This Rose Garden Candle
It’s a Showstopper – The three-dimensional wax flowers create a stunning visual effect that looks professionally made. Guests will be amazed when you tell them you crafted it yourself!
Makes a Thoughtful Gift – Handmade candles show you care. This rose garden candle is perfect for Mother’s Day, bridal showers, housewarmings, or as a “just because” gift for someone special.
Completely Customizable – Choose your favorite essential oils for a custom scent, adjust the pink tones to match your decor, or create seasonal versions with different color combinations.
Uses Natural Soy Wax – Soy wax burns cleaner and longer than traditional paraffin wax, and it’s a renewable resource. Plus, it holds fragrance beautifully and creates a smooth, professional finish.
Beginner-Friendly – Even if you’ve never made a candle before, this project breaks down into simple, manageable steps. The silicone molds make creating perfect flowers easy and foolproof.
Supplies You’ll Need To Make A Scented Rose Garden Candle

For the Candle:
- 2 cups Soy Wax Flakes – I love this brand for container candles
- 45-60 drops Essential Oil (1½–2 teaspoons) – Rose, lavender, vanilla, or your favorite scent
- Pink and Red Candle Dye
- Pre-Tabbed Candle Wick – Choose the correct size for your jar diameter (typically medium for 3-4″ jars)
- Glass Candle Jar – A 2-cup capacity jar, approximately 3-4 inches in diameter
- Silicone Mini Flower Molds – I used this mold to make wax roses in different sizes
Equipment:
- Double boiler or heat-safe pouring pitcher
- Thermometer (optional but helpful)
- Stirring utensil (wooden stick or metal spoon)
- Wick centering device or two pencils/chopsticks
- Scale for measuring wax (optional)
How To Make A Scented Rose Garden Candle With Soy Wax: Step-by-Step
Step 1: Prepare The Candle Jar and Wick
Clean your glass jar thoroughly with soap and water, then dry completely. Any moisture or residue can affect how your candle burns.
Center the pre-tabbed wick in the bottom of your jar, ensuring the metal tab sits flat against the glass.
To keep the wick centered while pouring, use a wick centering device, or create your own by laying two pencils or chopsticks across the top of the jar and wrapping the wick around them.
The wick should be pulled taut and standing straight up. Proper wick placement is crucial—an off-center wick will cause uneven burning and tunneling.
Step 2: Melt Soy Wax Flakes

Melt both cups of soy wax flakes using a double boiler.
If you don’t have a double boiler, place the wax in a heat-safe container or pouring pitcher, then set it inside a pot with 1-2 inches of simmering water.
Heat the wax slowly, stirring occasionally, until completely melted and reaches about 170-180°F.
Using the double-boiler method is key to preventing the wax from overheating or scorching, which can affect color and scent. Direct heat can cause wax to smoke or even catch fire, so always use this indirect heating method.
Step 3: Add Pink Dye

Remove the wax from the heat and add your pink candle dye.
For a soft, romantic pink like the one shown, start with a small amount of dye and gradually add more until you achieve your desired shade.
Stir thoroughly for at least one minute to ensure even color distribution throughout the wax.
The pink should be noticeable but not too intense – think “blush pink” rather than “hot pink.”
If the color becomes too saturated, lighten it by adding a small amount of additional uncolored wax. Keep in mind that soy wax tends to look lighter once it fully cools and sets.
Step 4: Add Essential Oils
Allow the colored wax to cool to approximately 140-150°F before adding essential oils. This cooler temperature helps preserve the fragrance, as high heat can burn off the delicate aromatic compounds in essential oils.
I recommend starting with 40 – 45 drops of your chosen essential oil per 2 cups of wax. Then add more drops if you want a stronger scent.
Stir the essential oil into the wax for 1-2 minutes, mixing thoroughly to disperse the scent evenly.
Popular choices for this romantic candle include rose, lavender, vanilla, ylang-ylang, or a blend of complementary scents.
Step 5: Pour Scented & Dyed Wax Into Prepared Candle Jar To Create The Base

Pour the scented, colored wax slowly and steadily into the prepared jar, holding your pouring pitcher close to minimize air bubbles.
Fill to about ½ inch below the rim, leaving room for your wax flowers on top. Pour at a temperature of about 130-140°F for the smoothest finish.
If you notice air bubbles forming as you pour, gently tap the jar on the counter or use a toothpick to pop the bubbles.
Pour slowly and steadily to minimize bubble formation.
Step 6: Let the Candle Cool
Allow the candle to cool undisturbed at room temperature for 4-6 hours, or preferably overnight. Don’t move the candle during this time, as movement can cause cracks or an uneven surface.
Soy wax can take longer to fully set than other waxes, so patience is key.
As the wax cools, you may notice a slight sink hole forming around the wick. This is completely normal with soy wax.
You can either leave it as is (it will be covered by flowers) or do a second pour to fill in the sink hole.
If you choose to do a second pour, reheat a small amount of wax to 140°F and pour just enough to fill the depression.
Step 7: Pour the Remaining Wax into Silicone Molds To Create The Flowers

Make the wax rose flowers while the wax is cooling in the jar.
There are a couple of different ways you can do this. I divided the remaining wax into two portions. In one jar, I added white dye to get a lighter pink. In the second jar, I added 2 drops of red dye to get a darker pink.
For the pink flowers, you can also create a custom shade by mixing red and white dye, or by using just a tiny amount of red dye to create a light pink.
Create a variety of roses in different sizes and colors. Tap the molds gently on your counter to release any trapped air bubbles.
Leave the flowers to cool completely for 1-2 hours at room temperature, or speed up the process by placing them in the refrigerator for 20-30 minutes.
Step 8: Remove Flowers from Molds

Once the wax flowers are completely hardened and cool to the touch, gently flex the silicone mold to release them.
The flowers should pop out easily without any sticking. If they resist, they may need a few more minutes to cool completely.
Handle the flowers carefully, as the petals can be delicate, especially on detailed molds. Set them aside on a clean surface until you’re ready to decorate your candle.
If any flowers have rough edges or imperfections, you can gently smooth them with your finger or trim with a craft knife.
Step 9: Arrange The Wax Flowers On The Base Candle

Once the base candle has completely cooled and hardened, it’s time for the fun part – decorating!
Arrange the pink and red wax flowers on the surface in any pattern you want. Try different arrangements before committing to one.
Consider creating visual balance by alternating colors and sizes around the candle. You might arrange flowers in a circular pattern, cluster them on one side, or create a scattered garden look.
Step back and view your arrangement from different angles to ensure it looks beautiful from all sides.
Step 10: Secure Flowers with Melted Wax
When you’re happy with the arrangement, it’s time to secure the flowers permanently.
To do this, melt a small amount of wax (about 2-3 tablespoons) in the double boiler. Using a spoon, carefully drip a small amount of melted wax onto the back of each flower, then gently press it onto the candle surface.
Hold for a few seconds until the wax begins to set. The melted wax acts as glue, bonding the decorative flowers to the candle base.
Use just enough to secure them without creating large puddles that are visible.
If the “glue” wax starts to harden, simply reheat it. Some candle makers prefer to slightly warm the candle surface with a heat gun before attaching flowers for an even stronger bond.
Step 11: Trim the Wick
Once all your flowers are secured and any melted wax has cooled, trim your wick to ¼ inch above the wax surface. This is the ideal wick length for a clean, even burn.
Use sharp scissors or wick trimmers for a clean cut.
A properly trimmed wick prevents smoking, mushrooming (carbon buildup on the wick tip), and excessive flickering.
You should trim the wick to this length before every burn, not just the first time. This simple step significantly extends your candle’s life and improves its burn quality.
Tips for Success

Temperature Control is Key
Investing in a basic candy/candle thermometer removes all guesswork. Pouring at the right temperature prevents frosting, cracking, and poor scent throw.
Choose the Right Wick Size
A wick that’s too small will tunnel, while one too large will create soot. For a jar that’s 3-4 inches in diameter, a medium-sized cotton wick typically works best. Check wick sizing charts from your supplier.
Prevent Frosting
Soy wax can sometimes develop a white, crystalline appearance called frosting. While harmless, it can detract from the pink color. Minimize frosting by pouring at the correct temperature (130-140°F) and avoiding temperature fluctuations during cooling.
Color Mixing Advice
Always start with less dye than you think you need. It’s much easier to add more color than to dilute an overly saturated batch. Test your color on white paper to see the true shade.
Create Contrast
For the most striking effect, create clear color differences between your red and pink flowers. If they’re too similar in shade, the design won’t have as much visual impact.
Save Leftover Wax
Don’t discard your leftover colored wax! Pour it into small molds to create wax melts, or save it in a container for touching up your candle or future projects.
Troubleshooting Common Issues

Sink Holes Around the Wick
This is normal with soy wax. Simply do a second pour with wax heated to 140°F, or cover it with your decorative flowers.
To minimize sink holes, pour at a slightly cooler temperature (around 130°F) and avoid disturbing the candle while cooling.
Wet Spots (Wax Pulling Away from Jar)
These marks where the wax doesn’t fully adhere to the glass are common with soy wax and don’t affect performance.
To reduce them, preheat your jars in a 150°F oven for 5 minutes before pouring, or use a heat gun to warm the glass.
Alternatively, choose jars with slight imperfections or frosted glass where wet spots won’t be as visible.
Flowers Won’t Stay Attached
Make sure both the candle surface and the flowers are at room temperature before attaching.
Use slightly warmer melted wax (around 160°F) as your “glue,” and press firmly for several seconds.
For stubborn flowers, gently warm the candle surface with a heat gun before attaching.
Candle Color is Uneven or Streaky
This happens when the dye isn’t fully incorporated. Stir your colored wax for at least one full minute, making sure to scrape the bottom and sides.
If you notice streaks after pouring, the wax may have been too cool. Maintain proper pouring temperature and stir well.
Candle Surface is Rough or Bumpy
Pour at the correct temperature (130-140°F)—too hot or too cool can cause texture issues.
Also, ensure you’re pouring slowly and steadily. A rough top will be covered by flowers anyway, but for a smooth finish, you can use a heat gun to gently melt and smooth the surface.
Wick Won’t Stay Centered
Use a proper wick centering device or make one with pencils/chopsticks. If your wick still leans, it might not be properly secured at the bottom, or your wax was too hot when poured.
Always ensure the metal tab is flat and centered before pouring.
Candle Tunnels When Burning
This means your wick is too small for your jar diameter.
The first burn is crucial. Always burn until the melt pool reaches the edges (typically 1 hour per inch of diameter).
If tunneling persists, you’ll need a larger wick for future candles.
Excessive Smoking or Soot
Trim your wick to ¼ inch before each burn. If smoking continues, your wick may be too large, or there could be a draft in the room. Move the candle away from air vents and fans.
Customization Ideas
Color Combinations for Every Season:
Spring: Soft blush pink base with light lavender and white roses scattered across the top, like cherry blossoms in bloom
Summer: Vibrant coral pink base adorned with sunny yellow and bright orange flowers for a tropical garden feel
Fall: Rich burgundy base topped with burnt orange and creamy ivory roses, reminiscent of autumn leaves
Winter: Deep crimson red base with pristine white flowers and a touch of silver mica shimmer for a frosted, elegant look
Essential Oil Blend Suggestions:
- Romantic Rose: 30 drops Rose Absolute + 20 drops Vanilla
- Peaceful Garden: 35 drops Lavender + 15 drops Chamomile
- Fresh Bloom: 30 drops Geranium + 20 drops Lemon
- Sensual Evening: 30 drops Ylang-Ylang + 20 drops Sandalwood
- Sweet Retreat: 35 drops Vanilla + 15 drops Jasmine
If you’re making this rose garden candle for Valentine’s Day or your anniversary, scent it with one of these romantic essential oil blends to set the mood.
Scenting with single aphrodisiac essential oils is also a great option if you want a single-note aroma.
Alternative Flower Molds:
- Dahlias for a bohemian look
- Peonies for a lush, full appearance
- Cherry blossoms for a delicate, spring feel
- Sunflowers for a cheerful, bright design
- Succulents for a modern, minimalist style
Beyond Flowers: Try embedding other decorative elements such as dried flower petals (around the outside of the jar), gold leaf, pressed flowers sealed with wax, or seasonal elements like pinecones or cinnamon sticks.
Gift Presentation Ideas
Elegant Packaging Options:
- Wrap the scented candle in tissue paper and place in a decorative box with ribbon
- Tie a piece of twine around the jar with a handmade tag
- Place it in a cellophane bag with dried rose petals at the bottom
- Create a gift set with matches, a wick trimmer, and a candle care card
- Nestle in a basket with other spa items like bath salts and a soft towel
Perfect Occasions For Gifting A Homemade Rose Garden Candle
This gorgeous candle can be gifted to anyone for any occasion, including:
- Valentine’s Day or anniversary gifts
- Mother’s Day presents
- Bridal shower favors (make smaller versions in votive holders)
- Wedding table centerpieces
- Housewarming gifts
- Teacher appreciation
- Self-care gift baskets
- “Just because” gifts for friends
Gift Tag Ideas: Include a tag with burning instructions and the scent description. You might write: “Hand-poured with love | Rose Garden Candle | Scented with [your essential oil blend] | Trim wick to ¼” before each use | Burn time: approximately 20-25 hours.”
Creating your own rose garden candle is a rewarding project that combines creativity with the satisfaction of making something both beautiful and functional. Whether you’re crafting one for yourself or as a heartfelt gift, this elegant candle brings a touch of romance and warmth to any space.
The best part about this project is that once you master the basic technique, you can customize it endlessly. Experiment with different colors, scents, and flower arrangements to create candles that perfectly match your style or the recipient’s preferences. From spring pastels to rich autumn tones, the possibilities are truly endless.
Don’t be discouraged if your first attempt isn’t perfect. Like any craft, candle making improves with practice, and even “imperfect” candles are beautiful and fully functional. Plus, the handmade quality is part of their charm!
Don’t forget to save this tutorial for future gift-giving occasions.
Frequently Asked Questions On DIY Rose Garden Candle
How long does it take to make this scented soy candle with wax flowers?
Active working time is about 30-45 minutes, but you’ll need to factor in cooling time. The wax flowers need 1-2 hours to harden, and the main candle should cool for 4-6 hours (or overnight) before decorating.
Plan to spread this project over an afternoon or complete it in stages.
How long will the candle burn?
A candle made with 2 cups of soy wax will typically burn for 20-25 hours with proper care. Always trim the wick before each use and burn until the wax melts to the edges on the first burn to prevent tunneling.
Can I use a different type of wax to make this rose garden candle?
Yes, you can. You can substitute soy wax with beeswax. Remember that beeswax requires higher temperatures of around 145-165°F to melt.
Will the flowers melt when I burn the candle?
Yes, the decorative flowers will gradually melt as you burn the candle, becoming part of the wax pool. This is part of the design!
The flowers add to the beauty even as they melt.
Can I make this candle without essential oils?
Absolutely! An unscented rose garden candle looks just as good. Alternatively, you can use good-quality fragrance oils designed specifically for candle making, which often have a stronger scent throw than essential oils.
Can I melt soy wax without a double boiler?
Yes. Create a makeshift double boiler using a heat-safe glass measuring cup or metal pitcher placed inside a pot with simmering water. You can also use a dedicated candle melting pot or electric wax melter.
What is the best way to store this scented soy candle?
Store your candle in a tightly sealed container to preserve the scent.
Keep the sealed container in a cool, dry place away from direct sunlight, which can fade the colors and soften the wax.
Can I add dried flowers instead of wax flowers? I
No, it’s best not to place dried flowers on top of the wax surface, as they are flammable and can catch fire. However, you can press dried flowers against the inside of your jar before pouring for a beautiful effect. Make sure to keep them away from the wick.